5-channel amplifier install:
 |
| I ran the power cable through the driver's (USA) side firewall near the brakes , being careful to not let the cord interfere with the break pedal operation even under worst care scenarios. |
 |
| I used the drivers side as the battery is on the driver's side and it is a fairly short run back. |
I later did the 5-channel amp, and it was a lot of work. More than expected perhaps 5 or 6 hours over two days, an hour or two taking everything out that I have to.
 |
| Both kick panels utilize a plastic nut to fasten them. Taking off the sides is a crucial first step to fishing cords from headunit to trunk. |
Another hour or less to fish the power cable up to the battery which I ran on the drivers side to try to shorten the length of cable in the engine compartment.
Then bringing that power cable back to the trunk via door sills. I snapped the sills out and the pillar partially out.
 |
| Front door sills have a bit of room for the power cable. |
The rear sills come out as a set
 |
| Rear sills out and wire can be run to the trunk without removing seat back or bottom. Best to have two people and fish it through. |
 |
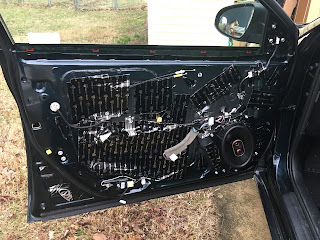
| Very intimidating like this. But I used Maestro's wiring diagrams and it helped me get through it. |
The next step was running the 6 channel RCA cables to the trunk (as well as a remote power lead) and 4 speaker wires that splice with the stock wiring. I did a really basic install for the first several days just to tune the system in. The infinity 4555a amp didn't need any increase of the gain on the 4 channel side of the amp, but on the subwoofer side, it did need need quite a bit of increase until I turned up the "sub eq" dial which seemed to attenuate the signal at minimal settings.
 |
| Infinity Reference 4555a 5-Channel Amplifier in rear sear of Avalon, next to dashboard piece for size comparison. |


Comments
Post a Comment